I have been working on Macs my entire professional career and have found them to be wonderful for content creation due to their easy use, simple design and usually problem free operation. It was no issue for me then to select GarageBand to record and edit my podcast for two main reasons; (1) it has great features that are MADE for podcasting and (2) it’s free with a Mac!
I’m not going to list all of the nooks-and-crannies of how GarageBand works since the white-sheets for the program are extremely simple to understand. I will, however, explain the step-by-step process of recording, editing and exporting an audio podcast with GarageBand and mention some pitfalls.
Organizing your files
Using GarageBand will mean that you will be producing at least two different files for each of your podcast episodes; (1) your actual GarageBand project file that is used for saving and editing your podcast and (2) your exported audio file ready for distribution. Personally, I like to place all of my GarageBand project files in a folder titled “GarageBand” and all of the exports into a folder named “Episodes”. Right now, the Ask Adam League distributes episodes primarily, but for other content that is different than an episode I like to save those files in a different folder.
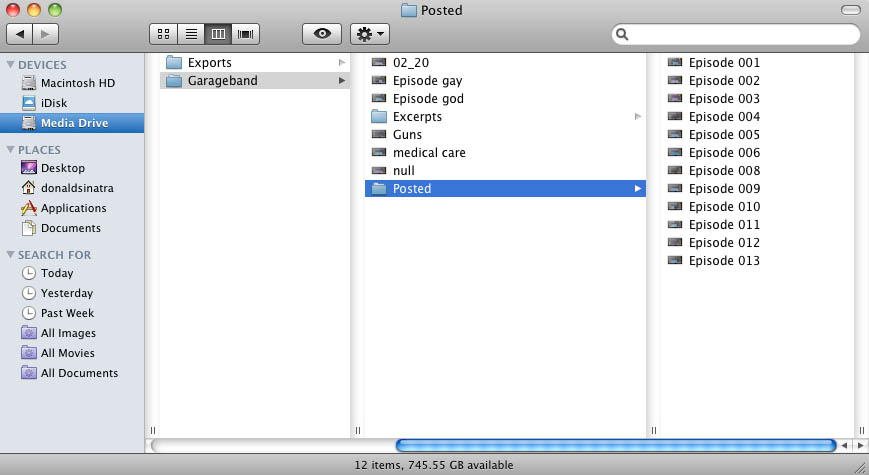
This organization is critical because the more content you produce, the more files you are going to have to sift through if (and when) you have to go back. This was the case with the Ask Adam League when we began moving our episodes over to YouTube. All of the GarageBand files needed to be accessible so we could re-export them to an AAC format for video distribution. So just make sure that whatever system you use, you develop something that works for you and is future-proof.
One last tip for file organization in GarageBand. I like to use a template project file so I am setting the parameters and effects for the recording only once. This helps save time and create consistency between episodes. The easiest way to do this is to save a GarageBand project file that is your master template with all of the saved parameters. Open this file each and every time you record a new episode. When you are done recording select File>Save As in the pulldown menu and save a new project file.
Recording
GarageBand is a very simple program, as many Apple produced applications are, and it’s even easier for people who have experience in video or audio editing. I’ll go through the basic process of recording on GarageBand.
The first thing you need to do when beginning to record for GarageBand is set up a template project that will be your standard recording project that can be duplicated and saved for all of your podcast episodes.
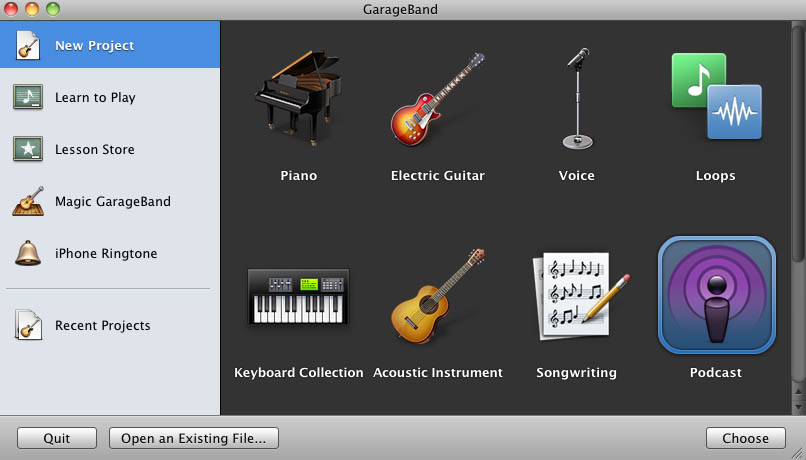
Open GarageBand, select File>New in the pulldown menu, select New Project>Podcast and select “Choose”.
You will be prompted to name your GarageBand project file (the extension is .band) and a location on your hard drive to save the file. Don’t worry about the tempo, signature or key parameters at the bottom.
A brand new project will be opened and ready for podcast recording. There will be a few things that you would like to change before recording at this point however.
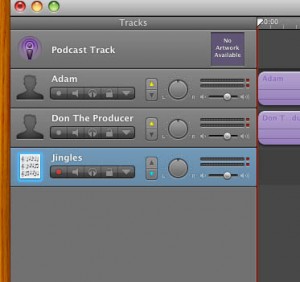
Make sure to name your tracks according to who they will be assigned to. I always assign Adam to the first track and myself to the second. Just click the name field and you’re on your way to editing the name.
It’s time to do some alterations to your tracks. GarageBand will put certain parameters at default.
Highlight the track you want to edit and select the “I” or information button at the bottom right of the software to reveal track info. Make sure that the “Browse” tab is activated as well. You are ready to edit your selected track. Select the Input Source pulldown to whatever device you will be using (mainly a microphone but you can do several things like record with other people over Skype which I will mention in a later post). For the best audio recording scenario you will want to select the input for each of your talent so you can have separate recordings on each track. It makes it a LOT easier to edit in post. Monitor basically indicates whether you want to actually hear the sound from that particular track in your monitoring device (speakers or headset). For a simple two person podcast you will want to turn the monitor “on” for anyone you want to hear and “off” for the track that is assigned to the operator of the software. Recording level is the level which the track is recorded at. Also, you can select different icons if you want to be cute. I certainly don’t need a female icon representing me on the second vocal track.
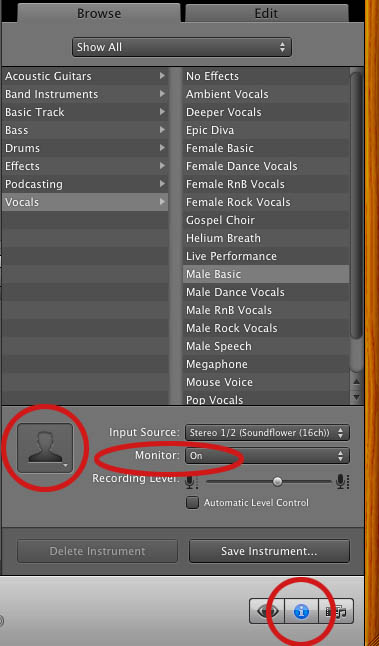
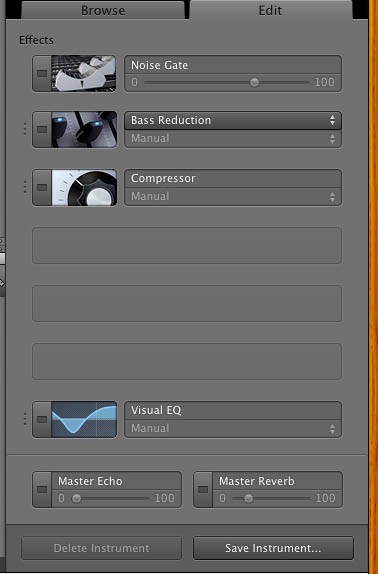
GarageBand applies some filters to the tracks by default that will need to be adjusted. To change these, click the “Edit” tab to activate the edit functions. Both the male and female tracks will have effects applied to each with varying differences within each effect. The difference between the effects in the male and female vocals are significant so make sure that you adjust the effects if you use them in your final mix. I turn off ALL of these effects during recording by clicking their respective blue buttons. You can have these filters active while recording and it will make no difference in the raw recording if you have them active or not; I like to have naked audio coming in and know that I will be able to adjust them later.
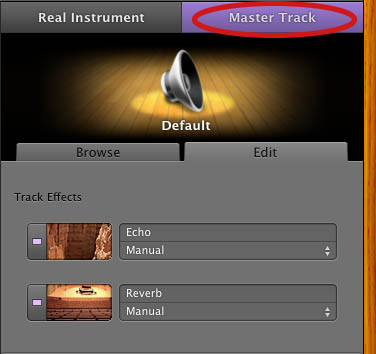
The Master Track, which defines any adjustments to all the tracks also has some setting by default. Highlight the “Master Track” tab at the top right of the interface and you will see the activated Track Effects in the “Edit” tab. You can go ahead and turn these off.
Rinse and repeat for both (or more) vocal tracks.
Ducking is an audio effect where selected tracks can be dominant or be submissive to other tracks. The best example is talk radio when the host is talking over a caller. The caller’s audio suddenly drops automatically when the host is speaking. “Up” means the track has precedence over the others and “Down” means that the track is submissive and will “duck” out it’s audio. I turn all these off in recording but you can leave them on if you wish.
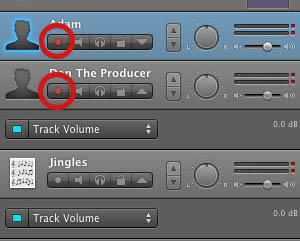
Lastly, you are going to want to enable recording for the tracks that you want to be recorded. This is done by clicking the “enable recording” button. If it’s red then the track will be recorded.
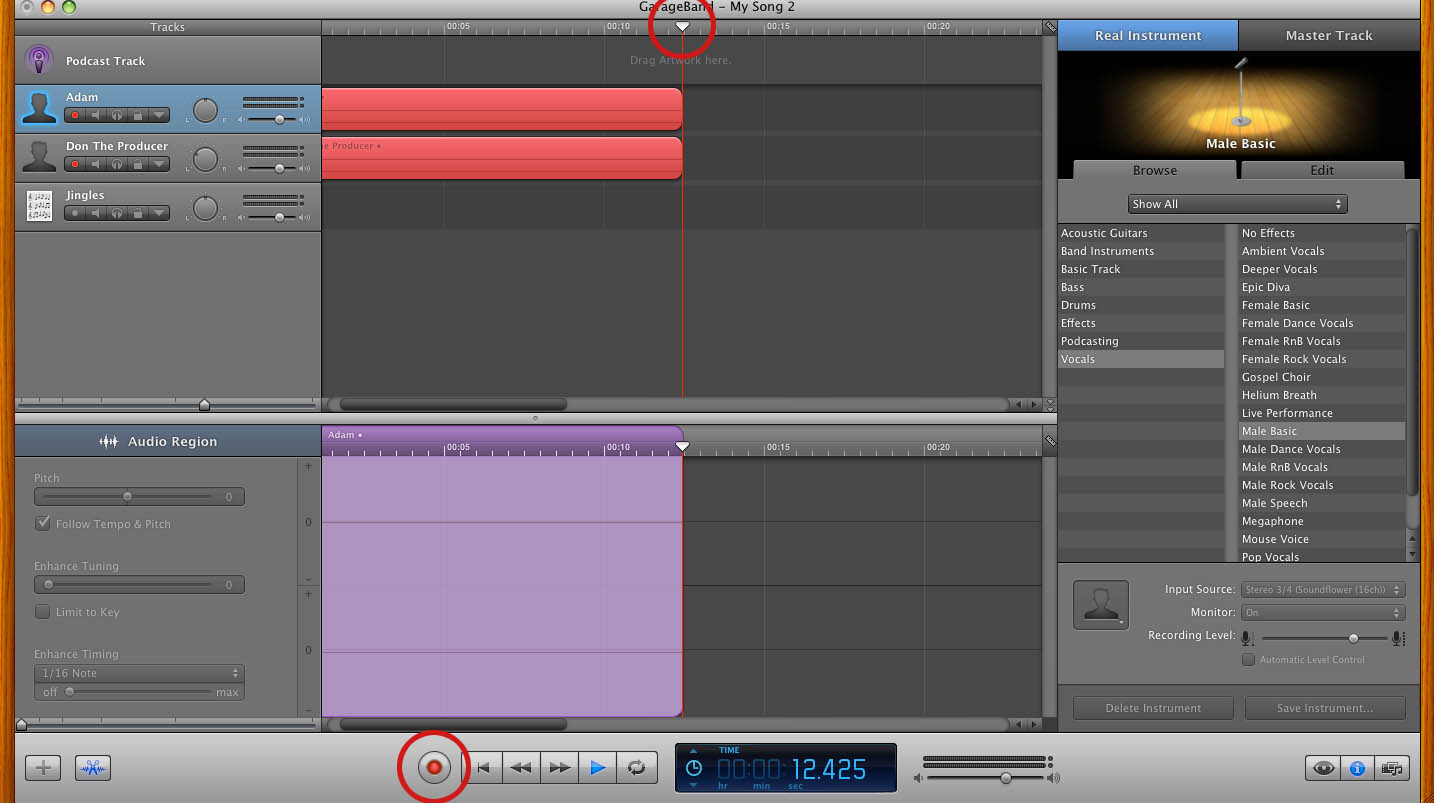
After that all you need to do is set your playhead to the location that you want to record at and then hit the big red record button.
Editing
Editing is extremely simple in GarageBand. The setup above describes a two person audio recording with separate channels allowing for the best audio editing scenario. Separate channels means that audio effects and editing can be isolated to each source. Two other tracks exist; the podcast track at the top (this is only necessary for advanced podcasts which is beyond the scope of this post) and a jingle track. The jingle track is a track where you can import music of your own or from the GarageBand sound library. I recommend that if you want music in your podcast that it be inserted in post so you can control the audio level, fade-ins and fade-outs.
There are several ways to edit sound in GarageBand and all of them can be found in the manual, however, I will explain in brief a few principles that are the most used. If you want to chop the ends off of tracks or simply split a track, place the playhead over the section you want to make a split, select the channel you wish to split and pres “command + T” or you can use Edit>Split in the pulldown menu. This will split the clip and allow you to trim the clips using the drag points at the end.
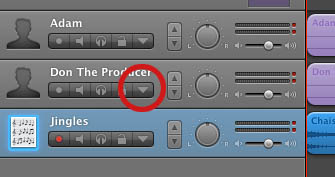
There will also be the time where you will need to adjust the volume levels of certain tracks over time. Say that you start with a significant level of your jingle track and you want to ramp it down when the voice of the talent comes in. GarageBand allows you to keyframe the volume level over time for individual tracks. To do this click the downward triangle below the track name, this is the automation button.
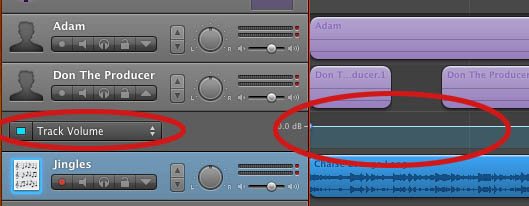
By default, the Track Volume function will be available. (There is a pulldown for track pan as well but we’ll just focus on the volume level). Click the grayed out button to the left of the Track Volume indicator and the key-frameable volume control band will appear in blue.
Now you can easily ramp up and down the volume control for any track. Just click on the blue line to create a keyframe which can be used as a node to control the volume over time. From this image you can see that the volume of the jingle track comes in strong and then dips down lower (but not fully out) as the talent’s track comes up to intro the show. After a bit, the jingle track slowly fades out.
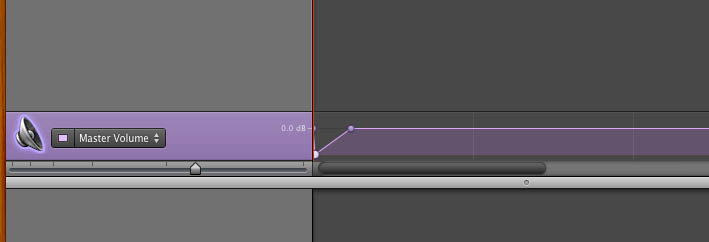
To adjust the overall volume of the audio in your project, you can enable the Master Track by going to Track>Show Master Track in the pulldown menu. You can adjust the volume with key-framing just as the individual tracks.
Exporting
Exporting a podcast is very simple. There are two types of exports that you can do (1) is for a standard audio podcast and (2) is for an advanced podcast which has chapter and image capability (I will cover this in another post).
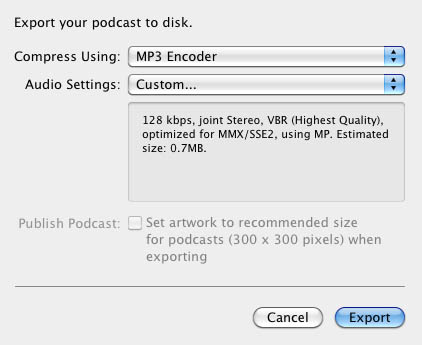
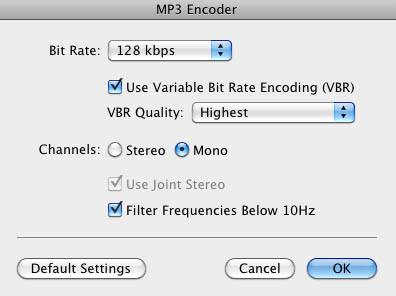
For exporting a standard podcast click Share>Export Podcast to Disk in the pulldown menu. A prompt will appear for setting the exporting parameters.
The Ask Adam League is a half hour all vocal podcast, except for some bookended music, so it doesn’t need to have a high end sampling rate. For an all vocal podcast of this length, what’s worked for me is going with the MP3 encoder and 128 VBR. Any compression that is taking place is practically unnoticeable at this bit rate and compression algorithm.
On the Compress Using pulldown, select MP3 Encoder. For the Audio Settings select “Custom”. You’ll have another prompt come up. 128 kbps (kilobytes per second) is just fine for a vocal podcast, anymore is just overkill unless you have a lot of music on your podcast and supreme quality is needed for that music. I always go with VBR quality as the “Highest”. Variable Bit Rate will automatically adjust the bits per second on the encoding of your podcast based on the “like” sound around it. CBR or Constant Bit Rate will have the same bit rate all the way through the podcast. So if you have VBR set as “Highest” like I do, GarageBand will automatically adjust the bit rates throughout your podcast saving space on your hard drive, your server and will make for quicker downloads for your listeners. For Channels, set it to “Mono” unless you have a LOT of music on your podcast and you really need your listeners to hear the nuances of the left and right channels of a song. But for a spoken podcast all you need is mono. It will help cut down on the size of your file as well. I always check Filter Frequencies Below 10Hz to knock out any annoying low-end sound that might be around. But I haven’t noticed a difference between it being enabled or not.
Pitfalls
- Make sure that your record indicator is red when recording on ALL the tracks you want recorded. If not, then you wont be recording everything.
- Save regularly! A system crash, program freeze, user error or any number of problems can occur and if you’ve spent some time cutting your project without saving then you can set yourself back a lot of time. Save right after you are done recording as well.
- Test record before you do your master record; every time. You’d hate yourself if you started recording and realized that the talent or host’s mic wasn’t recording or there is some other issue at hand.
- Make sure your audio is consistent between all of your channels. If your host is considerably louder than your talent, then your listeners will have a hard time focusing on your content.


I’ve been browsing on-line greater than 3 hours these days,
but I by no means found any fascinating article like yours.
It’s beautiful value sufficient for me. In my view, if
all website owners and bloggers made just right
content material as you probably did, the net will probably be much more useful than ever before.
Feel free to surf to my web blog … Compretion band
Have you ever thought about including a little
bit more than just your articles? I mean, what you say is important and everything.
But think about if you added some great graphics or video clips to give your posts more,
“pop”! Your content is excellent but with pics and video clips,
this blog could undeniably be one of the most beneficial in its niche.
Great blog!
my web blog – Carpal tunnel pain relief
Hello there! Would you mind if I share your blog with my
twitter group? There’s a lot of people that I think
would really appreciate your content. Please
let me know. Many thanks
Also visit my blog post witch altar supplies
This page definitely has all of the info I wanted concerning this
subject and didn’t know who to ask.
My web page :: Arthritis products
Thanks very interesting blog!
Feel free to surf to my site – carbohydrate-containing food (Erma)
That is really fascinating, You are an overly skilled blogger.
I’ve joined your feed and sit up for in search of more of your excellent post.
Additionally, I’ve shared your site in my social networks
Feel free to visit my homepage :: real estate investing mentor
Some genuinely rattling work on behalf of the owner of this internet site,
utterly outstanding content.
Here is my website hair type (http://online-advice225.wikidot.com/blog:10)
Hello to all, because I am in fact eager of reading this
blog’s post to be updated daily. It consists of fastidious stuff.
My blog: pagan witchcraft spells
It’s awesome to pay a quick visit this web page and reading the views of all colleagues regarding this article, while I am also keen of getting
know-how.
Also visit my homepage: Wrist pain
Thanks, I have recently been looking for info approximately this subject for a while and yours is the best
I’ve came upon so far. However, what in regards to the
bottom line? Are you positive about the supply?
my site … diet tablets (Malorie)
Awesome blog! Do you have any helpful hints for aspiring writers?
I’m hoping to start my own blog soon but I’m a little lost on everything.
Would you recommend starting with a free
platform like WordPress or go for a paid option? There are so many choices out there that I’m totally overwhelmed ..
Any recommendations? Thanks!
Also visit my web blog – Silver pro
Magnificent beat ! I would like to apprentice while you amend
your site, how could i subscribe for a blog website? The account aided me a acceptable deal.
I had been a little bit acquainted of this your broadcast provided bright clear
concept
my webpage; happy healthy living
hello there and thank you for your info ? I’ve definitely picked up something new from right
here. I did however expertise a few technical points using this website, as
I experienced to reload the website many times previous to I
could get it to load properly. I had been wondering if your
web host is OK? Not that I am complaining, but slow loading instances times will sometimes
affect your placement in google and can damage your high quality score if ads and marketing with Adwords.
Anyway I’m adding this RSS to my e-mail and can look out for much more
of your respective interesting content. Ensure that you update this again very soon.
my homepage :: real estate investment calculator – blackplanet.com –
Hello my loved one! I wish to say that this article is awesome, great written and come with almost all vital infos.
I would like to look more posts like this .
Take a look at my homepage Silverpro
Hi, just wanted to say, I enjoyed this blog post. It was helpful.
Keep on posting!
my weblog – Products for arthritis
I think you have remarked some very interesting points, thank you for the post.
My page – happy healthy living
Hi there, i read your blog occasionally and i own a similar one and
i was just curious if you get a lot of spam responses?
If so how do you prevent it, any plugin or anything you can recommend?
I get so much lately it’s driving me mad so any support is very much appreciated.
Visit my web-site … real estate investing –
http://issuu.com/,
As I website possessor I think the written content here is
real wonderful, regards for your efforts.
Feel free to surf to my web page investment real estate
Outstanding post, I believe website owners should larn a lot from this weblog its
real user pleasant. So much superb info on here :D.
Also visit my page: quit smoking (Luke)
If some one desires expert view about running a blog
afterward i suggest him/her to visit this webpage,
Keep up the fastidious work.
Look into my site: washington real estate investment trust (http://www.blackplanet.com)
Very quickly this website will be famous amid all blog people, due to it’s nice articles
Stop by my weblog Arthritis pain relief
Does your website have a contact page? I’m having problems locating it but,
I’d like to send you an e-mail. I’ve got some suggestions for your
blog you might be interested in hearing. Either way, great website and I look forward to seeing it expand over time.
Feel free to surf to my blog: Carpal tunnel treatment
Do you have a spam issue on this site; I also am a blogger, and I was wanting to know your
situation; many of us have created some nice practices and
we are looking to trade methods with others, why
not shoot me an email if interested.
Take a look at my blog post; getting free makeup (http://www.blogigo.com)
Thanks very interesting blog!
Also visit my homepage :: junk food (http://fit-forward5.hazblog.com/Primer-blog-b1/Lower-Your-Blood-Pressure-Heart-Rate-And-Anxiety-With-Mindfulness-Meditation-b1-p10.htm)
Hi there, all is going nicely here and ofcourse every one is
sharing data, that’s genuinely fine, keep up writing.
This paragraph gives clear idea in favor of the new visitors
of blogging, that in fact how to do blogging.
Also visit my web blog – pokemon sapphire rom cheats action replay (Lillian)
whoah this blog is magnificent i like reading your posts.
Keep up the good work! You recognize, lots of persons are searching around for this information, you could aid them greatly.
my webpage; check website worth
If some one wants to be updated with most up-to-date technologies then he must
be go to see this website and be up to date
everyday.
my web-site succubus demon
It’s enormous that you are getting ideas from
this piece of writing as well as from our argument made at this time.
my webpage: pokemon sapphire rom mac
Howdy I am so delighted I found your weblog, I
really found you by accident, while I was researching on Digg for something else,
Anyways I am here now and would just like to say many thanks for a tremendous post and a all round exciting blog (I also love the theme/design), I don’t have time to browse it all at the moment but I have book-marked it and also added in your RSS feeds, so when I have time I will be back to read much more, Please do
keep up the awesome work.
Here is my website :: womens diamond earrings
Someone necessarily assist to make seriously articles
I would state. That is the very first time I frequented your website page and so far?
I surprised with the research you made to create this particular
publish incredible. Wonderful activity!
My site; sterling silver dragonfly
Hello friends, good post and good urging commented at this
place, I am really enjoying by these.
Also visit my webpage; http://unhookingmats.co.uk/starting-an-aircraft-washing-service/
Hi! Someone in my Facebook group shared this website with us so I came to look it over.
I’m definitely enjoying the information. I’m book-marking and
will be tweeting this to my followers! Exceptional blog and
brilliant design and style.
Feel free to visit my blog post; http://www.northernfive.com/examining-the-piper-meridan-maintenance-resume/
Your way of telling all in this paragraph is in fact good, every
one be capable of effortlessly know it, Thanks a lot.
Also visit my web-site :: Embroidery OKC
Good day! Would you mind if I share your blog with my zynga group?
There’s a lot of folks that I think would really
enjoy your content. Please let me know. Thanks
Here is my web site http://schachclubolang.com/how-to-have-an-enjoyable-flight/
Wow, incredible blog structure! How long have
you ever been running a blog for? you make running
a blog glance easy. The whole look of your website is
magnificent, as neatly as the content!
Feel free to surf to my web-site – emprestimo de dinheiro online
I got this site from my pal who told me about this web site and at the moment this time I am browsing this web page and reading very informative content here.
Feel free to visit my weblog; BBQ repair in los angeles
What’s Happening i am new to this, I stumbled upon this
I have found It positively helpful and it has helped me out loads.
I’m hoping to contribute & aid other customers like its helped me.
Great job.
Feel free to surf to my blog post … real estate investments, http://webuyhousesfast26.shutterfly.com/,
I must show thanks to the writer just for rescuing me from this particular incident.
After checking through the world-wide-web and meeting things which are not helpful,
I believed my life was well over. Existing without the presence of answers to the problems you’ve resolved through your entire site
is a critical case, and ones which could have adversely damaged my entire career if I hadn’t
encountered the website. Your actual understanding and kindness in handling all the stuff was very helpful.
I am not sure what I would’ve done if I hadn’t
come upon such a stuff like this. I can also at this time relish my future.
Thank you very much for this skilled and results-oriented
help. I will not think twice to refer your web page to anybody who ought to
have recommendations on this topic.
my web-site :: real estate investing for beginners (http://sellmyhomefast54.postbit.com/be-successful-at-selling-real-estate-with-These-pointers.html)
Thanks for ones marvelous posting! I actually enjoyed reading it, you are a great author.
I will make sure to bookmark your blog and definitely will come back someday.
I want to encourage yourself to continue your great job, have a nice evening!
Take a look at my blog post – handy tips (Linda)
hi!,I like your writing very much! proportion we keep up a correspondence
more about your article on AOL? I require an expert in this area to unravel my problem.
May be that’s you! Taking a look ahead to look you.
I like the helpful info you provide in your articles.
I’ll bookmark your blog and check again here frequently.
I’m quite sure I’ll learn many new stuff right here!
Good luck for the next!
my webpage attracting women (wallinside.com)
Thanks very nice blog!
My webpage – top fashion (Dorthea)
I’m really enjoying the design and layout of your website.
It’s a very easy on the eyes which makes it much more enjoyable for me to come
here and visit more often. Did you hire out
a developer to create your theme? Fantastic work!
Feel free to visit my blog – pokemon sapphire rom north
america, Denice,
Hiya very nice site!! Man .. Excellent .. Amazing ..
I will bookmark your website and take the feeds additionally?
I’m glad to search out numerous helpful information here in the put up, we want develop more
techniques in this regard, thanks for sharing. . . . . .
Also visit my site; barbecue repair los angeles
Apresenta as singularidades e também os segmentos da voga masculina a arrebentar de movimentos sociais contemporâneos.
tire isso de mim e também perdoe-me se peco, Às vezes este pode
resultar em uma pegada bem classuda ou portanto em
alguma coisa extremamente moderno. está incorrer no 7º vÃcio mortal, se não for em outros, pois, repouso poderá
ser uma porta ocasião para outros pecados, ou
do corpo ora do espÃrito e, conforme
I haave been surfing on-line more than 3 hours these days, but
I never found any attention-grabbing article like yours. It’s beautiful
worth enough for me. In my view, if aall website owners and bloggers made excellent
content as you probably did, the inernet will probably be
a lot more helpful than ever before.
Here iis my homepage Gaziantep Escort _ Gaziantep Escort Bayan
What’s up, after reading this awesome piece of writing
i am too glad to share my know-how here with colleagues.
Hi would you mind letting me kbow which web host you’re working with?
I’ve loaded your blog in 3 completely different browsers and I must say this blog loads a
lot quicker then most. Can you suggest a gokod internet hosting provider at a reasonable price?
Kudos, I appreciate it!
Also visit my website: http://www.gazianteptufad.org
It is appropriate time to make some plans for the future and it’s time to be happy.
I have read this post and if I could I desire to suggest you some interesting things or tips.
Perhaps you could write next articles referring to this
article. I wish to read even more things about it!